
I usually get the information I need from Snowbums website. He writes in great detail, and in great depth, and is incredibly verbose. The site is a wonderful resource for BMW owners
13. It is very easy to loose the TEENSY TINY paper-clip type of springy-thingy that clips into the float NEEDLE …at a hole in the bottom of the float needle…and it wraps around the TANG of the floats bridge. Those are used only on the float needles that have a plunger with a hole sideways through it. It is typically lost when you are replacing the float needle. DO NOT LOOSE IT. I suggest ordering half a dozen & keep them on hand. Some put an old white bed sheet under the carburetor, to better find the parts that otherwise disappear. May not be a good idea, considering static electricity and potential for fire. Do NOT work on carburetors in the dirt; or on a grassy lawn.
14. For the STOCK one-piece floats: After you re-assemble the carburetor (without float bowl), ADJUST the tang on the float assembly (do NOT forget the float needle & its TEEEENSY spring, if used on your carburetor). The need for any tang adjustment is done with petcock ON, tang NOT twisted during adjustment. It must remain flat and horizontal… so that as you lift the float very gently & slowly the fuel cuts off as the float JUST passes the point where the float TOP is exactly PARALLEL with the BOTTOM METAL of the carburetor (where the bowl gasket fits). Don’t lift the float hardly much past that point. You should be doing all this with a fingertip! Now that you are wet with gasoline (why didn’t you wear plastic or rubber gloves?), you SLOWLY lower the float. The fuel should JUST BARELY start to flow with the float top just exactly parallel or a teeny amount lower. Not that way? Adjust the tang, and re-try.
(Why do Americans use the word gas instead of petrol, but still refer to a petcock?)
So, here we go. I am going to try to do this while the carbs are still on the bike.
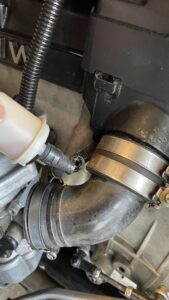 I mentioned in my previous post that the fuel hose looked past it. I bent it a little to see if I could encourage the air to come out of the filter and it broke! It offered no resistance at all.
As I need to be able to tun the petrol on to check the float levels I decided to replace the fuel lines first
I don’t think the hose is very old, I think it was new when I did the restoration around 4 years ago. I can’t remember where I bought it. Neither can I remember where the fuel hose clips came from. According to Snowbum, BMW do not use them, and they do not appear on the on line parts list.


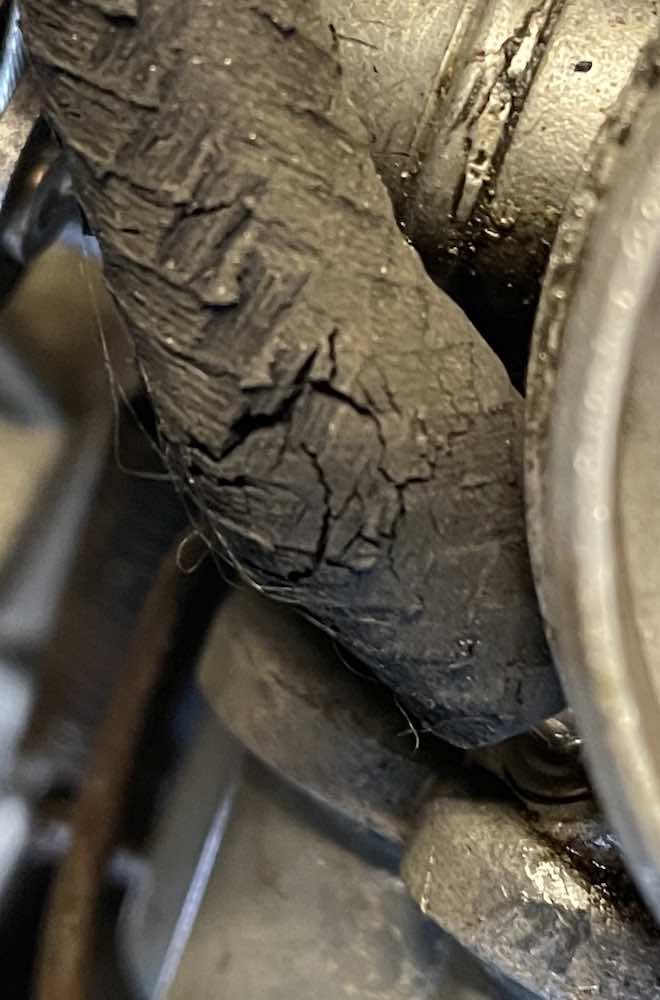
I had to unhook the carbs from the engine in order to remove and replace the fuel hose. and there is the hose weeping as it joins the carb. The other side was cracked, but not leaking yet. All of the hose was perished!
When putting a hose onto a spigot it is much easier if you put a little engine oil on the spigot first. When removing a hose it is much better to push it, rather than pull it. I have an old screw drive with a groove cut in the end which works well for this.
I decided to follow BMWs recommendations and assembled it back together without fuel clips other than on the aftermarket fuel filter.
Those hoses were an accident ready to happen.
While the carbs were hanging loose anyway I changed the floats.
6. Float level: The original method of adjusting the float level (single piece floats) is to have the carburetor upside down & the float structure NOT doing anything but lightly kissing the float needle (certainly not being finger-pressed to move the float needle spring loaded tit, used on all later models). That method is NOT needed, but can be done on the workbench if the carburetor is being overhauled or otherwise worked on off the bike. A good method, when the carburetor is already on the engine, is to turn the gas off, remove ONE bowl, then turn gas on. Lift the float slowly & gently, until the gas JUST BARELY shuts off. At that point the top of the float should be parallel with the bottom of the carburetor casting. Double-check this by LOWERING the float quite slowly …until the fuel just BARELY starts to flow. The approximate same parallelness should exist. You should do this second step (or, do it as the first & only step) due to the spring loaded plunger at the lower end of some of the float needles; as well as some variations in the sloppiness of the float needle & floats hinge pin. It eliminates errors. In a rare case that you find the float needle plunger tit (most models have that type of float needle) frozen up, fix that, usually with a new float needle.
If you experience surging or similar running-out-of-fuel effects at FAST and high throttle cruising, & you open the gas cap …with no help after 10 or 15 seconds, …& fuel filters & actual fuel flow HAVE BEEN PROPERLY CHECKED to be OK …then you may have the adjustment of the floats for fuel level to be too low:
Actual bowl fuel level check:
Turn the fuel off, remove one float bowl, empty its fuel into the tank (look for globules of water, if any, toss the fuel someplace, like your cleaning tank or can), replace the bowl, turn gas on, allow bowl to fill (10 to 15 seconds), turn gas off, THEN remove bowl quickly & squarely. Measure the fuel depth from the center bottom to the fuel top. I suggest using a thin, narrow, machinists steel rule. Do your best to have the bowl sitting flat & level on its base, & estimate the best you can with #1 eyeball (yes, will still be meniscus errors), the exact height of the fuel from the bottom. For the 32 mm carburetors (except early /5 motorcycles, which have their own article, https://bmwmotorcycletech.info/earlybingR75CV.htm, use 24 mm fuel height. For the 40 mm carburetors, use 28 mm fuel height. If your find your gas level quite high, and you DID set the float adjustment properly for fuel flow/stop, float top parallel with the body, then the one-piece white float unit may be bad. Information on the floats is posted in a companion article on this website, https://bmwmotorcycletech.info/bing-floats.htm. Refer to that article for information on removing/replacing the float. The stock floats last about 30K, sometimes considerably more. ALWAYS replace the float needle at that same time.
I’m getting doubts about this.
The old floats weighed 13 and 14gms. The new ones are 12gm – not 10gm as Snowbum suggests.
The old girl has 32mm carbs and her new floats were not parallel to the carb body. The float had to be too high to stop the flow. So I adjusted the tang with a bit of leverage from a screwdriver and that was fixed.
But having set the floats as recommended, I measured the level in the float bowl. It was 22mm not 24mm as Snowbum suggests. Now I have a feeling that had I NOT got the floats parallel, then the level may have been 24mm? Maybe BMW set the tang to cater for heavier floats?
Time for a sanity check
Fuel is sucked through the jets by virtue of the vacuum in the manifold (for the pilot jet) and in the volume behind the butterfly valve for the main jet (modified by the needle). Vacuum levels are of the order of half an atmosphere or around 3 metres of water. Plainly, the pressure of a few centimetres of petrol will have no virtually no effect. As long as the level is high enough to keep the jets covered and low enough to not slosh out of the breather, when the bike is running and vibrating, that’s all that is important. The actual height doesn’t matter a damn.
I’ll keep a check of the mixture by the time honoured method of checking the colour of the spark plugs and not worry about carburettor floats. Hopefully the new needles will stop the intermittent flooding.
But the bike would not start because the battery was not up to it. It fired a couple of times, then the turnover got slower, then the solenoid started dropping out. I did mention in my previous post that the battery was something to keep an eye on. Well I have done and it’s goosed. I suppose 5 years life isn’t too bad. Some posts on Adventure Rider say that six years is OK but the posters have there battery on a “tender” in the garage. Well my bike starts fine when I’ve just disconnected the charger. It did after two hours on a 5 amp charger. . But I want to be able to leave it for a week or two if I visit somewhere.
(This reminds me of the folk who post on motorhome websites that their leisure battery has lasted for ten years if it can keep the lights on for an overnight stay in-between charging from the engine while travelling or a hook up. I want it to last 1-2 weeks!)
My heated grips controller is connected straight across the battery. I measured the standing current drawn by the controller when in the off position. I measured 50uA. So that adds uo to under 0.5Ah in a year. It’s not a problem.
I can get another Euoroline for £54.95 + £7.97 delivery from Tayna. It is 20AH and 100A cranking. Motobatt batteries get a good press. The MB51814 fits the bike according to Motorworks and its 22AH and 220A cranking, but it’s £95.50. Tayna are selling it for £79.99 + £7.97 delivery. £15.51 cheaper than Motorworks but £25 dearer than the Enduroline. I’ve ordered the Motobatt from Tayna.
Update 25th March
Battery ordered, but I new there would be problems when Tayna chose Yodel as the courier. Yodel has a reputation for abysmal service, at least here in Cornwall.
I was told that delivery would be 23rd. We would be out that day so I changed it to 24th.
24th came and went – no battery
Tracking says the parcel is at the depot and expected delivery will be yesterday
I tried to use Web chat to get an answer:- useless as expected.
Hi xxxxxxxx,
Thank you for contacting Yodel. Please find the details of your webchat conversation below.
Lekhni 09:16:47: Good morning, xxx.
xxxxxxxx 09:17:08: Hello.
xxxxxxxx 09:18:12: According to the tracking my parcel is still at the Depot and the delivery date is yesterday.
xxxxxxxx 09:21:42: Is anyone there???????????????????
Kind regards,
Yodel
So I tried again
This time I got an answer saying the driver was on his way, despite the tracking site saying the parcel was still at the depot. They could give no idea of a delivery time and the driver could not be contacted. So they have not heard of mobile phones.
I finished my chat at 9:47 and at 10:34 I got an email saying it was on the way. I was delivered at 15:43, which was right in the middle of the 14:55-16:55 time slot, so the delivery driver did a great job, and he had 70 deliveries before mine.
Oh well, 24 hours late, the new battery is here now.

In the meantime the bike was rideable. I took it for a ride and it went very well. Strangely it started better on half choke rather than full choke, and when warmed up the tickover was a little slower than I remember. But the air temperature was around 14C. I’ll adjust the tickover and keep an eye on it.
There was no sign of leaking from the carbs. I am not convinced that I actually needed to change the floats, but I think that the needles were the issue. Certainly had I not looked in that area I would not have known that the hoses were about to fail at any point.
Good result