
This article was first published on 11/02/2014. It was the third of a series of articles about my experiences with the electrical system and the leisure battery in my Motorhome.
This is hopefully the final part of the saga. ( Update – it wasn’t)
I now have the Banner battery installed and I hope to keep it for a long time. In Part 1 I described how I have added some electrics to bypass the power distribution unit thus saving lots of wasted power. In Part 2 I described what I had to do to be able to last a week on the battery and without an EHU.
Following a few trials I have had to make a couple of small modifications to the bypass circuit described in part 1
The Water Pump
The original PDU system works as follows – you switch the system on – the water switch is off by default – so you switch it on. The pump runs for a second or two to pressurize the system then it switches off. Turn on a tap, the water flow under pressure, the pressure is released so the pump starts again. It you have the tap switched half on, then the pump keeps stopping and starting. BUT here is the issue:-
Sometimes, the feed line from the fresh water tank to the pump will not have water in it. In normal operation his could be caused by a small leak in a joint or the pump letting air in and thus letting the water drain back to the tank. Or maybe the vibration and the water sloshing about when travelling on a “low” tank may let air into the feed pipe. It always happens, of course, when the tank is empty. The pump cannot build up pressure by pumping air – it has to have a liquid.
My original system did not have a switch for the water so with an empty tank, or with air in the pump, it would run continuously when the power was on. So I have added a switch in the water pump circuit.
The awning light
There is no separate awning light switch in the van as standard. It can only be switched on by the controller unit. As described in Part 1, the controller unit is inefficient. I would need a minimum of three relays taking 0.14A each in order to switch on the awning light which is a 15W bulb. Thats 1.67 Amps. Now I envisage sitting under the awning with friends for an estimated 8 hours a week – thats a whopping 13.6AH from the battery.
So after finding the relay that switches on the awning light, (not as easy as it sounds – the circuit diagram is wrong at this point and there is an extra relay fitted externally to the PDU) I added another wire, a schottky diode and a switch. This eliminated the need for the three relays. I then replaced the bulb in the awning light with 12 leds on led strip. Now I did not get this right first time. For some reason the wires feeding the awning light wereblack for positive and red for negative!! Beats me.
I had originally intended to put double the number of leds, but with only the 12 it looks brighter than the original bulb.
When I switch on the awning light its slightly brighter than the original and the current is only 0.2A. So my eight hours under the awning will now only consume 1.6AH instead of 13.6.
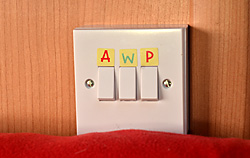 Control Switches.
P=Power
W=Water
A=Awning
The control panel
 I mentioned in Part 2 that I would probably put a switch in the control unit to switch it off when not needed. I have done that, (its the button on the left) and it works. Now when I leave the van with the my power switch off and the fridge on gas, drain on the battery is only around 13AH as opposed to 33AH with the control unit on.
An extra rooflight
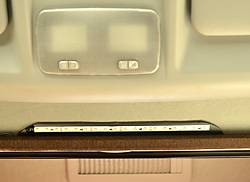 The van is generally very bright inside with the lights on, but the cab area is unlit. There is the usual cablight in the middle but, annoyingly, this switches off after the ignition has been off for a few minutes. So finding stuff in the front glove compartments ot the many cubby holes involved a torch! Primitive. So I have added some extra LEDs in the front area. I simply connected them in parallel with the front driver side spotlight so they switch on with this spot. Current is 0.3A. It looks really nice when on too, illuminating the curtain in the front.
Finally
Using the figures in Part 2 I should be taking about 40AH (I originally estimated 42AH but the awning light takes less than originally estimated) from the battery in a 7 day period. Its a 120AH battery. It will self discharge around 10% per month or 2.5% per week or 3AH. After a week I will have taken around 43AH or 35% from the battery. Even a fortnight would be just over 70%. That should be fine for me. I can’t imagine going for more than a week without moving on. The altenator should charge up the battery completely again in around 3 hours driving
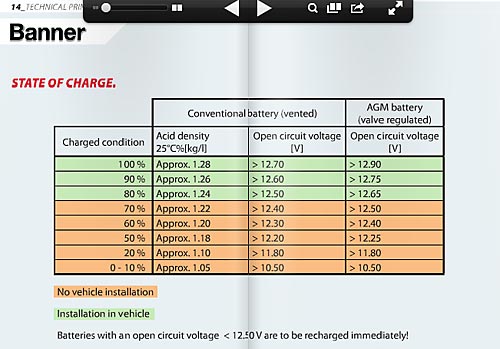
But, to avoid mishaps I have just ordered a 2 wire 4 digit digital voltmeter which I will install, connected through a push button switch to keep an eye on it. Everything gets switched off at night so in the morning the battery will have stood without load for around 8 hours so this table from Banner should give a reasonable idea of the state of the battery.
The effect of all of the modifications listed above has been to drastically reduce the standing current taken from the battery both when parked “in the street” and “on site”. I initially fitted an isolator switch which I don’t really need now, although it is handy for measuring the current taken by lights etc. I simply put an ammeter across the isolator then open it.
If I am parked “in the street” with the fridge switched off then the standing current is about 10mA. With the fridge on “battery” (it works off the vehicle battery and only with the engine running) it takes 20mA. As standard the current drain is around 120mA. So that has reduced consumption from 20AH per week to about 3.5AH per week (I usually have the fridge on battery)
If I am parked “on site” and not in the van then, due to the fridge re-igniter being switched on current drain is about 90mA. It was 200mA so consumption is reduced from 33AH per week to 15AH per week.
I’m quite happy with the mods. In reality I never have to have an EHU whether I am away any length of time.
Water is the next issue.